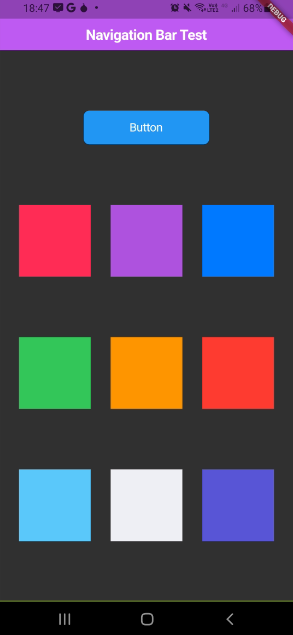
Decidi postar a tela que eu tentei replicar no exercício, porém com algumas diferenças de Widgets, porque eu estava lendo a documentação e estou utilizando o Material Design do iOS que no caso é o pacote Cupertino que da pra importar no próprio Flutter.
A minha tela está dessa forma, acrescentando um botão também, segue abaixo:

Código da main
import 'package:flutter/material.dart';
import 'package:flutter/cupertino.dart';
import 'package:flutter_course/home_screen.dart';

void main() {
  runApp(const MyApp());
}

class MyApp extends StatelessWidget {
  const MyApp({super.key});

  // This widget is the root of your application.
  @override
  Widget build(BuildContext context) {
    return MaterialApp(
        theme: ThemeData.dark(),
        title: 'Flutter Demo',
        home: const HomeScreen()
    );
  }
}


//         Container(
//           color: Colors.white,
//           child: Column(
//             mainAxisAlignment: MainAxisAlignment.spaceEvenly,
//             crossAxisAlignment: CrossAxisAlignment.center,
//             children: [
//               Stack(
//                 alignment: AlignmentDirectional.center,
//                 children: [
//                   Container(color: Colors.red, width: 100, height: 100),
//                   Container(color: Colors.blue, width: 50, height: 50)
//                 ],
//               ),
//               Stack(
//                 alignment: AlignmentDirectional.center,
//                 children: [
//                   Container(color: Colors.greenAccent, width: 100, height: 100),
//                   Container(
//                       color: Colors.purple.shade400, width: 50, height: 50)
//                 ],
//               ),
//               Row(
//                 mainAxisAlignment: MainAxisAlignment.spaceEvenly,
//                 crossAxisAlignment: CrossAxisAlignment.center,
//                 children: [
//                   Container(color: Colors.purple, height: 50, width: 50),
//                   Container(
//                       color: Colors.amber.shade200, height: 50, width: 50),
//                   Container(color: Colors.cyan.shade300, height: 50, width: 50),
//                 ],
//               ),
//               Container(
//                 color: Colors.amber,
//                 height: 30,
//                 width: 300,
//                 child: Text(
//                   'Olá mundo',
//                   style: TextStyle(
//                     color: Colors.black,
//                     fontSize: 25,
//                   ),
//                   textAlign: TextAlign.center,
//                 ),
//               ),
//               ElevatedButton(
//                   onPressed: (){},
//                   child: Text('Aperte o botão!'))
//             ],
//           ),
//         ));
//   }
// }


